• Home
  • Hardware & Software
  • Manual Configuration

Valcom SIP Intercom Controller Manual Configuration

This article will go over how to manually register a Valcom SIP Intercom Controller, such as the Valcom VE8090R.

Written by Garrett Heggem

Updated at September 28th, 2023

Contact Us

  • The Essentials
    FAQs Forms
  • Announcements
    Carrier Events mFax Events Platform Events Release Notes
  • Billing Administration
    Datagate OneBill
  • Faxing
    mFax - Analog mFax - Digital Native Fax
  • Hardware & Software
    Manual Configuration Provisioning NDP Axis Cisco Fanvil Grandstream Polycom Snom Yealink Mobile Applications Desktop Applications Mobile-X SNAPbuilder TeamMate Connector UC Integrator
  • Hosted Voice
    Auto Attendants Branding Call Queues Call Routing CDRs Conferencing E-911 Features Fraud Integrations Inventory / Phone Numbers Local & Toll Free Porting Onboarding Recommendations SNAP.HD SIP Trunking SMS / MMS Users Voicemail Caller ID
  • Troubleshooting
    VoIPmonitor Firewalls PBX
  • Ray's Stuff
+ More

Table of Contents

Scope Requirements Obtain SIP Credentials Register Device

Scope

Intended Audience: WLP Partners and Tier 1 Technicians or above.

This article will go over how to manually register a Valcom SIP Intercom Controller, such as the Valcom VE8090R.


Requirements

  • Office Manager access to Manager Portal or higher.
  • Access to the Controller Software of a Valcom SIP device.
 

Obtain SIP Credentials

  1. Log into Manager Portal 
  2. Navigate to Phones
    NOTE: Office Managers can navigate to Users > select the user > Phones
  3. Select Phone Info for the phone you wish to register.
    NOTE: You will only see the information if the phone model is set to Manual or Softphone.


Register Device

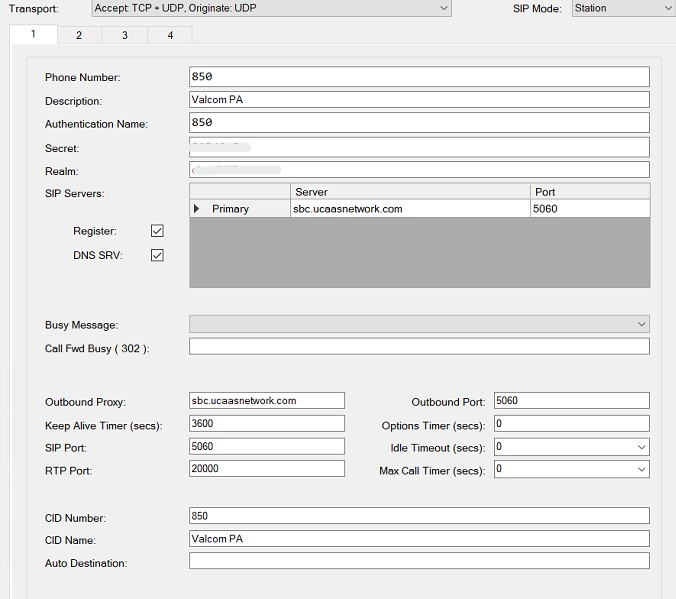
  • Phone Number: Input the Extension
  • Description: Input a Description
  • Authentication Name: Input the Username
  • Secret: Input the Password
  • Realm: Input the Domain/Proxy
  • SIP Servers: Input your SIP Server
    • sbc.ucaasnetwork.com - ATL
    • sbc-las.ucaasnetwork.com - LAS
    • sbc-grr.ucaasnetwork.com - GRR
    • Port 5060
  • Check the boxes for Register and DNS SRV
  • Outbound Proxy: Input your SIP Server again.
    • Port 0
  • Apply these settings to the device and it will register.
configuration sip intercom

Was this article helpful?

Yes
No
Give feedback about this article

Related Articles

  • Snom M100: Manual Configuration
  • Digium IP Phone Configuration
  • cnPilot R200/R201: Manual Configuration
  • Snom: M300 Manual Configuration

Knowledge Base Software powered by Helpjuice

Expand